Simple Brine Pickle Recipe :
Here we offer a very general widely acceptable simple brine pickle recipe and method. This is probably the most common “gateway” into the fermenting world. It was for us! Feel free to add your own spices but keep in mind the brine percentage should remain the same if not a little stronger!
Equipment needed:
- Enough fermenting containers to accommodate the amount of cucumbers you wish to turn into pickles!
- Sharp knife and cutting board
- Postal scale for measuring salt [yes you can convert grams into teaspoons but weighing is better]
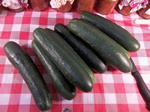
- Fresh and not overly mature pickling type cucumbers [you can use squash, zucchini and even watermelon rinds if you are a bit experienced]
- Water. Preferably non chlorinated or fluoride treated. [see NOTE: below]
- Spices. This post is intentionally vague with the ingredients! We have included some basic spices that is great for general purpose use
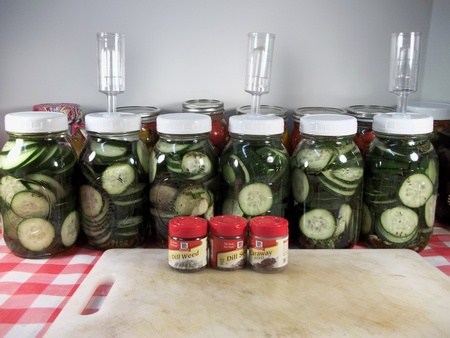
- 1/2 teaspoon dill dried or 3 heads of fresh dill per quart and or dill seed
- 2 small clove garlic per quart [most people add to much garlic!]
- Add a few hot peppers for a little heat.
- 1/2 teaspoon caraway seeds
- a few peppercorns
- 1 handful fresh grape, cherry, oak, and/or horseradish leaves [these are sources of tannins which aid in keeping pickles crisp]
- Non iodized salt 1 teaspoon per quart. [Iodized salt or salt with caking ingredients will effect your ferment]
∗Keep in mind this post shows more an introductory to the fermenting art more than a recipe. We will post some good recipe links below. Do the math when adding the called for spices and add that amount to each jar you are going to use.
Directions:
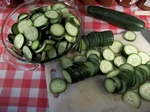
STEP 1 Slicing and Dicing: Slice, dice, cut or leave whole the cucumbers you desire to ferment. Do a few jars of each style! Keep in mind tho that the different cuts will ferment at different speeds and may absorb spices differently as well!
NOTE: Setting aside regular tap water for 24 hours will allow chlorine to evaporate. Boiling for 10 minutes will also do this BUT will not remove floride treatments!
STEP 2 Preparation: Rinse the cucumbers only lightly. Do not scrub intensely. As this recipe does not call for a starter culture, we are relying on the bacteria present on the cucks. Cut the cucumbers into slices either long wise or across grain. If you want whole pickles, cut 1/4″ of the ends off. It is important to at least cut this from the blossom end as it contains hormones that can make the pickle soggy.
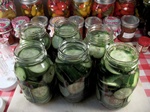
STEP 3 Packing and Salting: Pack your cucumbers in the jars tightly allowing for whatever weight system you are going to use. Add spices towards the bottom of the jar and the leaves towards the top. You can use a small spice bag to maintain better control of your spices and prevent them from migrating to the top of the brine and reduce chance of mold in doing so. At this time we will add our salt at the rate of 1/2 teaspoon per quart. There is also a chart below for those who wish to simply cover their cucumbers with a brine of a certain percentage. As you can see the chart will result in a less salty pickle which may not suit everyone. As long as you do not go below the recommendations in the chart, you will be fine.

NOTE: Again this is a choice that a starting out fermenter should make early in his career , whether to use an airlock system of not! With a crock, you simply set lid on crock. With a Fido you can simply close and with an airlock equipped jar you will tighten fully. With a regular kidded jar you will want to fasten lightly and be prepared to "burp" at regular intervals to prevent a possible explosion or other messy event :)
NOTE: Make sure your airlock is just clearing the inside of the grommet and allow 1/2" airspace from surface of contents to the airlock bottom.
STEP 5 Tending and Tasting: Start tasting once you notice the fermentation action has slowed down. This will happen faster in “chip” sliced cukes and slower in “whole dills”. There may be a “skim” on the surface. You will remove it and replace your lid. [SEE NOTE BELOW:] Constantly opening the container removes the CO2 blanket that the gasket and airlock have helped create and will allow outside contamination to enter. The older and more advanced the ferment is will lessen this from happening as the sugars are less and the acidity is raising towards the point where only lacto bacteria will be able to thrive.
NOTE: The pickles are cured when well-flavored and even in color. There should be no white spots and they will have a translucent appearance.
NOTE: In the event you do notice something developing in your ferment then by all means open and inspect.
Possible Problems:
Things to look for include floating “skum” on surface which is usually KAHM YEAST and can easily be removed by mopping the surface with a paper towel or clean rag. It is generally a dull “flat” [not shiny] buildup and white unless your brine is colored. It can grow in a rippled fashion and generally covers the whole surface compared to molds which concentrate on the bits of vegetation they anchor on to grow. Nothing to worry about as it is usually on the brine surface only. Left alone to grow it will cause an off flavor but not dangerous.
Other molds that can develop will result in mushy contents near surface and possibly proceeding into the contents. Molds generally grow on floating bits of fermenting foods. They will be colored, white, fuzzy or furry. If a foul odor or a sliminess is noticed it may be best to trash the ferment and reflect on what went wrong. Most of the time it is because YOU DID NOT KEEP THE CONTENTS UNDER THE BRINE! and can in most cases be easily rectified with a little common sense.
Once the ferment is to your liking you can replace your fermenting lid with a regular one and place the jars in the ice box where they will keep for an extended period of time. These ferments can develop mold even in the ice box as they do not have any of the added chemical preservatives that your store bought ones have and are more subject to spoilage unless you decide to process them.
BOTTOM LINE:
You can save an average of $1.79 a quart minimum. Your cost: $0.05 IF you grow your own dill and grow your own cukes.
What does that mean to the average consumer? According to this report, we use 9-11 pounds of pickled cukes annually in the USA based on our age group. An additional 5-7 pounds of fresh cucumbers as well. At a pound per quart this would mean that you would need 11 quarts per person. and another 2 gallons of fresh cucks per person. That translates into an annual saving of $20.00 a year. I think this number is highly under inflated 🙂 ! BUT keep in mind that we also use pickles in relish form in dishes like pickled eggs, potato salad and as a condiment with a meal.
We can also try fried pickles! If we make them we will eat them. Personally we eat about a quart a week of pickles in one form or the other. This reflects a saving of $100 a year. Not great but is a start. Like anything that you make at home. you will usually find ways to use it that are appealing and not at all monotonous.
Here is a chart showing how to make a simple liquid brine based on percentage:
Water is U.S. Volume Measurement and salt is in grams:
% brine  1-cup  2-cups  4-cups   8-cups   16-cups
                1-pint  1-quart  2-quart  1-gallon
 2%      5gm     10gm    19gm     38gm      76gm
2.5%     6gm     12gm    24gm     48gm      95gm
 4%      10gm    20gm    39gm     76gm     152gm
 5%      12gm    24gm    48gm     96gm     190gm
10%      24gm    48gm    95gm    190gm     380gm